Just about every successful trapper I know dyes and waxes their traps prior to trapping season. Like so many things in this day and age of modern conveniences and instant gratification, modern products and methods have evolved to simplify the dying and wax process. These new products and methods have been around for quite a few years and they include products that are mixed with gasoline or water. Traps are dipped in the mixture to form a protective coating on your traps.
Speed Dip comes in brown and black and is mixed with unleaded gasoline. The exact directions are printed on each can. It has been my experience, that the gasoline based dips are ok to use on water traps, however, I just do not like the idea of gas odors on my canine line.
For over 40 years, I have preferred to traditionally dye and wax most of my traps. I find it does not take much more time than using some of the trap dips previously mentioned and for me; the traditional methods do a superior job of keeping my traps in speedy order, camouflaged, and odorless. I have much better piece of mind setting a traditionally dyed and waxed trap and it is part of a confidence level that I feel really helps my catch rate every year.
You will need the following items and materials to properly traditionally dye and wax your traps.
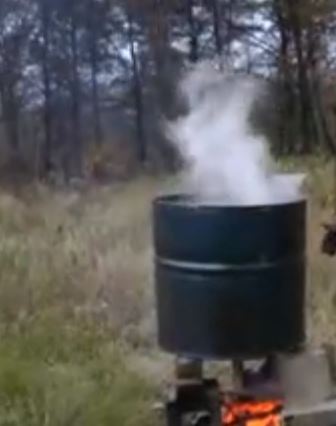
- Boiling Pot – I use a 55 gallon steel drum, removing the top 2/3 of the drum. I have also used a 25 quart stock pot for smaller quantities of traps.
- Heat Source – I use a propane burner or 3 cement blocks and hardwood fire for heat source.
- Trap Dye – Commercially available logwood black or red, powder or crystals. Free if you can gather Sumac Berries, Tag Alder, or Maple Bark.
- Trap Wax – Available in white, black, and yellow. All work great.
- Wax Melting Pot – Just larger than your largest trap.
- Location to hang traps outside to dry.
- 1 Nail for each trap – to go between each trap jaws so dye and wax can penetrate.
The very first thing a trapper must do prior to dying and waxing traps is to make any modifications or adjustments that are going to be done to the traps. Coilspring type traps should be adjusted so they set flat and have a pan tension of between 1 ½ and 2 lbs. for fox and coyote trapping, and lighter for traps that will be set in the water. These settings allow the trapper to cover the trap with bedding material at the set and have enough tension to not fire on smaller rodents. Until you get a feel for that amount of tension, there is a tool called the Sullivan’s Trap Tester on the market that can help you , or you can make a lead weight of the afore mentioned weight. Any inline shock springs or extra swivels should also be installed prior to dying. Insert a nail between the jaws of all foothold type traps to allow the dye and wax to penetrate all areas of the trap.
All the methods of treating traps have one thing in common and that is that they require the trap to have a light coat of rust to properly absorb the dye. So, for those dying used traps, that already have a coat of rust, one only needs to remove excess dirt and rust with a wire brush. To get a light coat of rust on factory new traps, I cover them with water in the boiling pot and bring the water to a boil. Simmer for 30 minutes. The factory oil and dirt will rise to the top of the pot, so add water to overflow the factory oil and dirt. Place the traps in a shaded area on the ground outside for a few weeks, spraying with a light water mist occasionally to make the rust form quicker and more evenly.
After all your traps have a light coat of rust, you are ready for the trap boiling dye pot. I recommend choosing a day with light winds and no rain as I almost always dye and wax traps outdoors. Yes, It means sacrificing one great fishing day to take care of your traps. The good news is if you start early on a Saturday morning, you should have plenty of time for a fishing trip or barbecue in the afternoon. The light winds make it much easier and safer to control the propane or wood fire you are using to heat your trap boiling pot.
Place your logwood trap dye or natural material (sumac berries or maple bark) in a burlap sack and tie closed. Place the sack of dye into the boiling pot. Most bags of logwood dye will tell you approximately how many traps it will do. In my 1/3 barrel, I usually place about 3 pounds of logwood dye or 5 pounds of other natural material. I then add water, staying approximately one foot from the top of the boiling barrel. Light the propane burner or hardwood fire and bring the water to a boil. The traps can be placed in the boiling pot as soon as the water is added. As the water heats up, you will see your dye darken the water. After you bring the mixture to a boil, I simmer for a ½ hour. Some dirt or oil may float to the top of the water, so I add a couple of 5 gallon buckets to overflow the stuff I do not want to pull my dyed traps through. After ½ hour, turn off your heat source and let the water cool down. Once the water is cool enough, you can remove your traps.
The traps are then hung to air dry and are ready to wax as soon as completely dry. There are two methods of waxing traps. The first, which is my preferred method, is using a double burner and melting enough wax to completely cover your largest trap. The other is melting wax on top of the boiling water in the trap dye pot and pulling the trap thru the wax.
I prefer to not wax body grip type traps. I simply dye them. If you do wax the body grip type traps, make sure for safety to remove any wax on the trigger mechanism. I dye and wax all foothold type traps (i.e. coilspring, longspring, and jump type traps).
Your double burner is made by placing the wax in your waxing container, which is just large enough to submerge your largest trap. This container is placed in a larger container with water and a metal separator in the bottom to place your waxing container on. It is highly recommended to use the double burner as the wax cannot get hotter than 212 degrees F. Using your propane cooker, bring the water to a boil. After the wax is completely melted, dip trap into the melted wax, completely submerging, and let remain for 2-3 minutes. I connect the trap to a piece of wire in order to lower it in the melted wax. Slowly pull trap out of the wax and let any excess drop off. They will quickly dry and be ready to store in wooden box or plastic tub, ready for trapping season.
There should be a clear coat of wax with no heavy white build up of wax after removing the trap from the wax. If not done properly, you have to repeat the above process and let the trap remain a little longer in the wax before removing. All foothold traps should have the wax removed from the dog and notch area of the trap; otherwise the traps will fire prematurely and be difficult to keep in the set position.
A final note on liquid dips; even though I prefer to traditionally dye and wax my traps, sometimes I want to add traps during the season, so I do occasionally use the quicker dips. The job will not be as nice since the dips do not do well on brand new traps without rust. However, it does help protect them from rusting and offers minimal camouflage and is better than just simply setting the traps in the elements.
In the next couple of months of the Michigan Woods N Water news, watch for articles as I share my methods for trapping Michigan’s abundant furbearing animals. We will start off with some sets and methods that will help you trap Fox and coyote. Hopefully, you had time to read this and the previous articles I wrote and you will be ready to harvest some wall hangings or earn a little extra money for Christmas presents.
The 2017 Michigan Trappers & Predator Callers Association Convention will be held August 18th & 19th at the Osceola County Fairgrounds, Evart, Michigan. See their website for details http://www.mtpca.com They always have a lot of trapping supply vendors and great trapping demos. If you get a chance stop by my booth and say Hi.
Directions on how to wax and dye traps
More Wax and Dye Products
Dye Black Logwood Crystals 8 oz. Package
Speed Dip and Other Trap Wax and Dye Products
Trapping Books Written By Herbert Lenon FREE online versions.
- Secrets of Successful Trapping Fox, Coyote, Bobcat Trapping by Herb Lenon
- Beaver and Otter Trapping Book Online by Herbert Lenon
- Mink and Muskrat Trapping Book Online by Herbert Lenon
- Raccoon, Opossum, Skunk and Weasel Trapping Book Online by Herb Lenon
Lenon Lures Online Product Catalog
Trappers check out our Dvd's Video on Trapping Furbearing Animals Herbert Lenon's Trapping video
Herbert Lenon and John Chagnon Trapping and Fur Handling Videos Dvd's
Herbert Lenon and John Chagnon Trapping and Fur Handling Videos Dvd's
Ebay carries all of Lenon Lures® products and is a great place to find deals on all kinds of used and new traps & trapping equipment at great prices
Follow the links below to some more great trapping information on Lenon Lures website ...
Secrets of Successful Trapping Fox, Coyote, Bobcat Trapping by Herb Lenon
- Beaver and Otter Trapping Book Online by Herbert Lenon
- Mink and Muskrat Trapping Book Online by Herbert Lenon
- Raccoon, Opossum, Skunk and Weasel Trapping Book Online by Herb Lenon
- Herb Lenon Trapper's Hall of Fame Article
- Herb Lenon 1947 Full Page Ad in Fur Fish Game Magazine
- How To Trap Fox & Coyote - Herb Lenon and Asa Lenon
- Mink Trapping by Herb Lenon Article 1946
- Trapper's Bible of Trapline Secrets, Sets and Knowledge by Herb Lenon
- Monthly Tips on How To Trap by John Chagnon & historical writings Herb and Asa Lenon of Lenon Lures


